
The subwoofer is the unsung hero of home theater. While those fancy highfalutin full-range speakers get all the love – with their swanky mid and high-range frequencies – the sub lays the crucial audio foundation.
I’ve always enjoyed getting the subwoofer set up just right. It’s probably because I played bass in a few bands back in the day. So don’t let me down and get this part wrong.
A powerful sub provides unmatched bass you can feel. But to get the best sound, you need to hook it up right. Though it seems simple, subwoofer wiring requires some thought. So, what do you need to know about connecting a subwoofer?
Main Topics
Subwoofer Connection Types
There are two main ways of connecting a subwoofer to your speaker system:
- Low-level connection: also known as an LFE, .1 or line-level connection
- High-level connection: also known as a speaker-level connection
The one you will use will usually depend on the type of amplifier that you are using to power your speakers. And sometimes, on the kind of audio that you are listening to.
Many subwoofers will have both connection types. However, some may have only one or the other.
Some subwoofers, like those made by the popular subwoofer brand REL Acoustics, have a separate low-level and LFE connection. However, most brands will just have a low-level and/or a high-level input.
It’s a good idea to check this before you buy a new subwoofer. To make sure that it has the correct inputs for your system. Although, in most cases, you won’t have a problem.
What Is a Low-Level Subwoofer Connection?
The low-level connection on the rear of a subwoofer will look something like this:

Image Credit: SVS
Note that SVS uses the term line level rather than low-level. It’s the same thing.
The most common use for a low-level subwoofer input is when you are using an AV receiver for multi-channel surround sound audio.
Most AV receivers will have a dedicated subwoofer pre-out on the back. This will usually be marked as ‘sub’ or LFE. The AV receiver will then send two types of low-frequency sound to your subwoofer:
- The LFE track on a surround sound movie. LFE refers to low-frequency effects in multi-channel soundtracks like 5.1 or 7.1. The ‘.1’ denotes a dedicated channel for low-end sound effects, which is typically sent to a specialized speaker – the subwoofer. Full-range speakers can also reproduce the LFE track if a subwoofer is not used.
- Bass management in AV receivers improves surround speaker performance by directing low frequencies to the subwoofer. This is done by setting a crossover frequency for each speaker, filtering low-end sounds and passing them to the subwoofer through the low-level input. Crossover frequencies can be the same or unique for each speaker. Enabling bass management is common but optional.
However, you don’t have to restrict your listening to surround sound movies. Many people enjoy listening to music using their front two stereo speakers and a subwoofer. This is called a 2.1 speaker system.
The same rules apply, though. There is no LFE channel in music, but the bass management in the AV receiver will send some of the low-end frequencies into the subwoofer. From the kick drum and low bass guitar notes, for example.
Some people like the sound of stereo music using the large subwoofer driver to fill out the low-end. I do. Some don’t like it and prefer to hear the natural balance of sound provided by their stereo speakers alone.
An AV receiver isn’t the only reason to use a low-level subwoofer connection.
If you have a stereo amplifier with left and right pre-out connections – or a dedicated sub-out – then you can also use the low-level inputs on the subwoofer.
So, you would usually use the low-level input on your subwoofer if:
- You are using an AV receiver with a subwoofer pre-out
- You are using a stereo amplifier with a subwoofer pre-out
- You are using a stereo amplifier with stereo pre-outs
Bottom line? If you use an AV receiver and want to use the bass management in your receiver to get a better low-end than your surround sound speakers can provide – use the low-level subwoofer connection.
What Is a High-Level Subwoofer Connection?
The high-level connection on the rear of a subwoofer will look something like this:

Image Credit: SVS
It will often be speaker wire terminals – like the speaker channel connectors on the back of an amplifier. However, another common high-level connection type is a Neutrik Speakon connection. It looks like this:

The main advantage of using a high-level subwoofer input connection is that the speakers and subwoofer receive the same audio signal.
There are no potential phase issues between the mid and low frequencies, and the sound signature of the amplifier will be present in both signals.
In most cases, you would use the high-level subwoofer connection when you want to connect a subwoofer to an amplifier that doesn’t have a dedicated subwoofer output or a stereo line-out.
This would usually be a stereo amplifier – although some older home theater receivers might not have dedicated subwoofer outputs. Some stereo receivers do have a subwoofer output – but most don’t.
So, if you use a stereo amplifier and speakers for listening to music or movies – and you would like a 2.1 system with a subwoofer – you can use the high-level connection on the sub to filter the low frequencies from the same audio that is going to your stereo speakers.
There is another alternative.
Even if you have an AV receiver with bass management and a sub output, you might want to use the low-level connection for movies – and a high-level connection for listening to music.
Some people prefer the sound of music using a high-level subwoofer connection for music as it may give a more natural sound, rather than using the digital filtering in the receiver to send the low frequencies to the sub.
So, you would usually use the high-level connection on your subwoofer if:
- You are using a stereo amplifier without a dedicated subwoofer or stereo pre-outs.
- You are using an AV receiver or stereo amplifier with a subwoofer pre-out or stereo pre-outs – but prefer the sound of music via the high-level connection.
Of course, it doesn’t just have to be music you listen to when you use high-level inputs on an AV receiver.
You can watch movies too. It’s just that you won’t get any bass management or LFE channel from the high-level connection.
Unless you have a REL subwoofer. For movie audio, REL Acoustics recommends making a high-level connection and using their dedicated LFE low-level input.
As they say, there are many ways to skin a cat (not that I’ve tried – all you cat lovers out there). You can decide which one you prefer.
- Learn more: How to choose home theater speakers
Connecting the Subwoofer
Now that you understand the different options, let’s look in more detail at how to connect a subwoofer.
These examples mostly use SVS subwoofers. These are high-quality speakers, and they have a range of different models to suit any home theater room.
However, you may have a different brand, so your connections and controls may be slightly different. But, generally, most subwoofers will have similar options, so you should be able to follow along without a problem.
If in doubt, always refer to the manual for your subwoofer. Go on. It won’t bite!
How to Connect the Low-Level Input on a Subwoofer
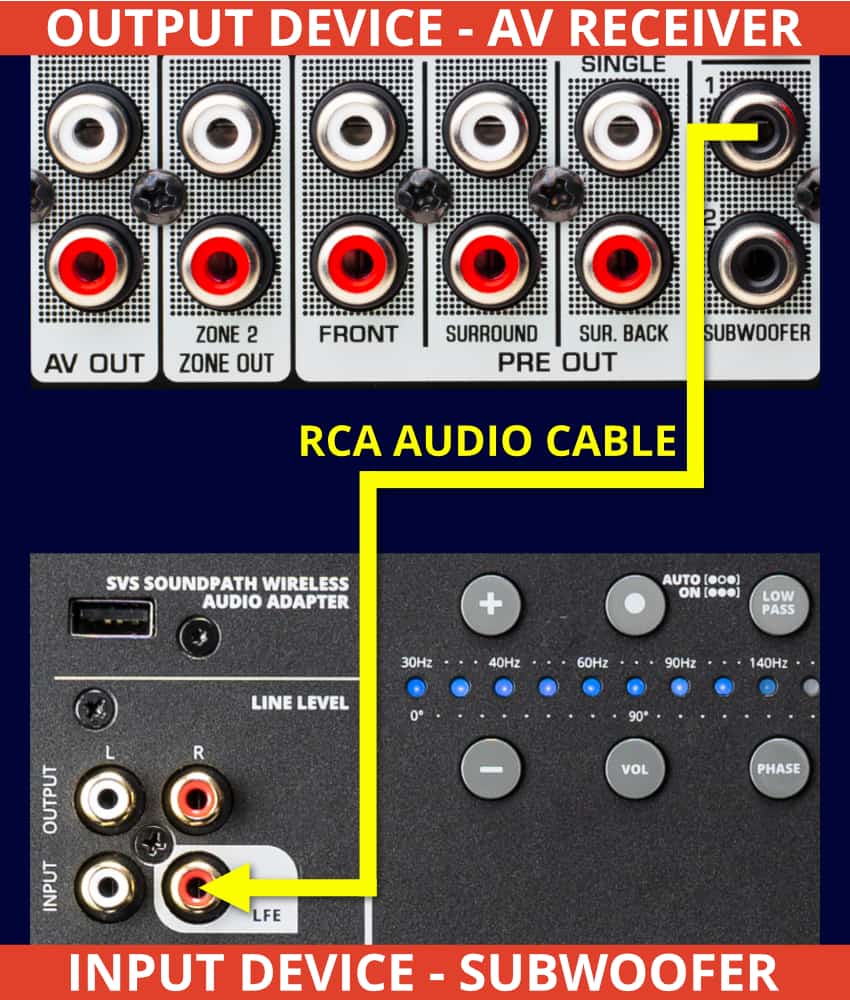
The low-level input on your subwoofer will usually require a direct connection from your AV receiver using a single RCA cable.
Although you can buy dedicated ‘subwoofer cables,’ you don’t have to buy one of these if you don’t want to.
Any RCA interconnect will work. Although, I wouldn’t use the thin, cheap RCA cables that often come bundled with a DVD player. You can if you like, though.
Something like this from BlueRigger will be good enough for most installations:

- Popular brand
- Dual-shielding
- Available sizes: 6, 8, 15, 25, 35 and 50 feet
- Also suitable for connecting other audio components with RCA inputs and outputs
- Select the correct length for the job. Don't buy one too long, unless you know you might move the subwoofer in future.
A thicker coaxial cable with more shielding should offer better performance and more protection from noise and hum in the signal. But in most cases, you will be fine without anything too extravagant.
As with all cables, if you need a particularly long one – say 30 feet or more – a more expensive brand with a higher build quality might minimize signal interference. But for shorter runs, any well-made cable will be fine.
You will connect this cable from the subwoofer pre-out on your AV receiver to the LFE or mono line-level input on your sub. All subwoofers will have a low-level input of some description.
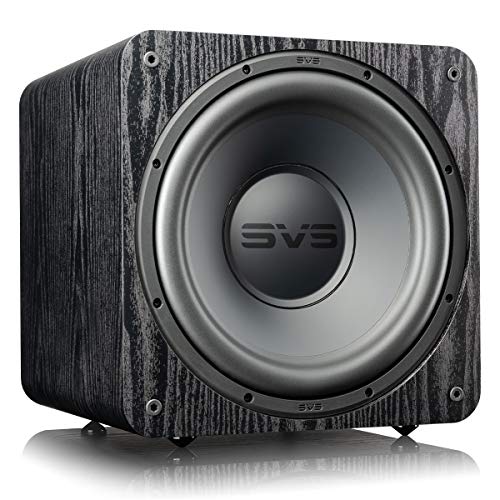
The example here is the very popular SVS SB-2000 Pro:

- Front-firing 12-inch driver
- High output levels - 550 watts
- Frequency response: 19 - 240 Hz +/-3 dB
- Excellent smartphone app for remote control
- It might be too large for a small room
In the picture below, you can see an example of the low-level inputs:
Different brands will label this in different ways.
However, if there are two RCA line inputs, then one will usually be labeled LFE or mono. This is the one to use for a single subwoofer output on an AV receiver.
Why Does a Subwoofer Have Two Line Level Inputs?
It is common for some subwoofers to have two line-level inputs. You can use these if you have a stereo receiver or preamplifier with stereo pre-outs.
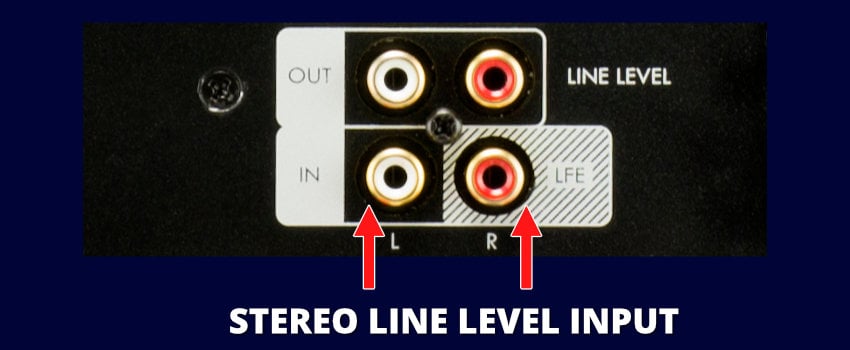
Image Credit: SVS
Connect two RCA interconnects from the stereo pre-out of the amplifier or preamplifier – to the left and right inputs on the subwoofer.
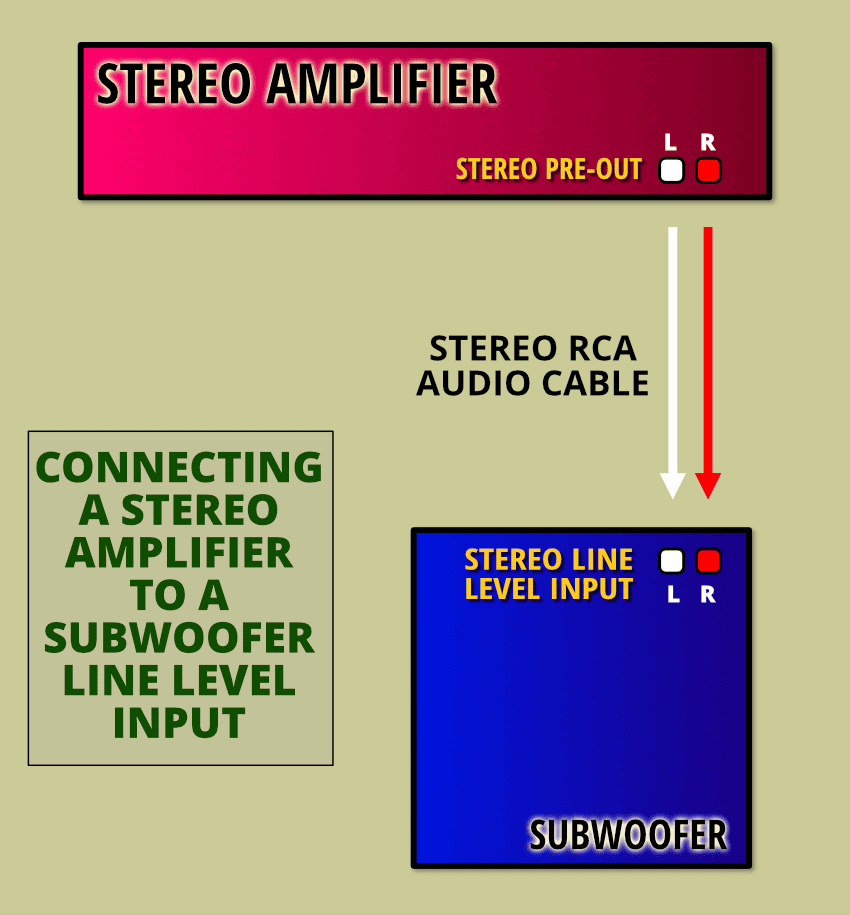
In this case, you won’t have any bass management from the amplifier, so you will get the full-range audio signal.
Therefore, enable the onboard line-level filter on the subwoofer to balance the sound with your main speakers.
How to Connect the High-Level Input on a Subwoofer
Remember, when you use the subwoofer’s high-level input, you receive the amplifier’s full frequency range audio signal.
So, you need to feed the complete audio signal from the amplifier’s speaker connections into the speakers – and the subwoofer.
I have seen a couple of different ways of doing this. Always consult your subwoofer’s manual in case it differs from the methods I describe here.
Connecting a Subwoofer with Speaker Wire
A common high-level connection type is speaker wire connectors on the subwoofer’s rear.
An excellent subwoofer that has this type of connection is the SVS SB-1000 Pro:
- Ideal for small to medium-sized rooms
- Great value for the quality
- Sealed 12-inch driver
- 325 watts RMS output
- Frequency Response: 20 - 270 Hz ±3 dB
- Remote control via the smartphone app
- It might not offer enough power for larger rooms - although you could always install two.
You can see the high-level inputs on the rear of the SB-1000 here:
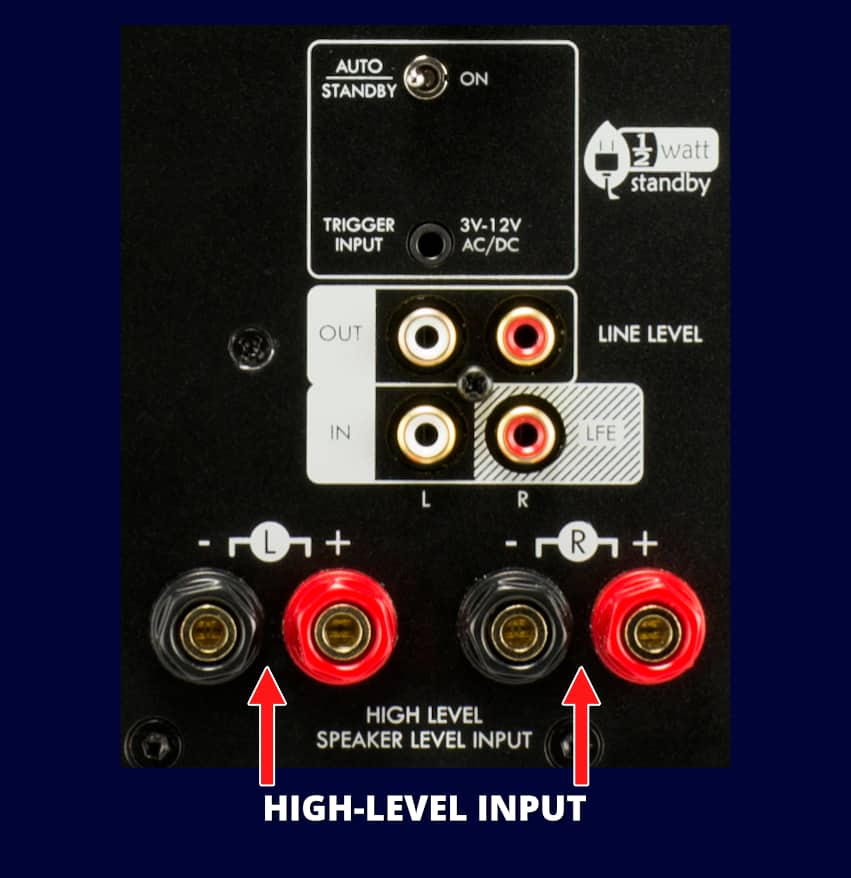
Image Credit: SVS
Looking closely at the back, you can see the speaker wire connections. These are the same type of connections that you will find on many hi-fi speakers.
You connect this by running two sets of speaker wires from the rear of your amplifier.

One set will connect to the terminals of your left and right speakers in the usual way, while the other wires will connect to the subwoofer.
Make sure you match the amplifier’s positive/negative and left/right connections with the speakers and subwoofer.
If you want to know more about this, take a look at how to connect speaker wire. Once connected, use the subwoofer’s gain, filter, and phase controls to blend the sound with your front stereo speakers.
Wiring a Subwoofer with a Neutrik Speakon Connection
Another common high-level connection type for subwoofers is a Neutrik Speakon connector. You can see an example of the connection and cable here:

The Neutrik Speakon cable has a connector at one end, which plugs into the port on the rear of the subwoofer.
The other end has three bare wires that connect to the speaker terminals on your amplifier. This might be an AV receiver, stereo amplifier or preamplifier.
The standard way of wiring this is that one wire goes to the positive terminal of the right channel., another to the positive terminal of the left channel, and the final wire connects to the negative terminal of either channel. But not both.

The purpose of this is to preserve the earthing of the amplifier and to avoid introducing ground loop hum.
The wires are color-coded; you must connect the cables to the correct terminals. Consult your subwoofer manual to make sure you get this right.
After you have this in place, the process is much like the previous example.
You would use the subwoofer’s filter to balance the low-end frequencies with that of your front full-range speakers.
Can You Connect Both the High and Low-Level Connections at the Same Time?
Maybe. But you should check the manual of your subwoofer to see if this might be a problem. Some models allow this. Some recommend that you choose between one or the other.
Of course, this will only apply to a subwoofer with high- and low-level inputs.
However, even though you can connect them both, it’s not usually recommended to have audio going through each connection simultaneously. Why?
- The conflicting low-end frequencies will likely muddy the sound and make it difficult to control the bass.
- You might be in danger of overloading the amplifier and subwoofer with audio levels that it simply isn’t designed for.
So, why would you want to connect both? Because you might want to listen to some material using the low-level connection and some using the high-level input. A typical example is an AV receiver.
With loud explosions and low-end effects, movie audio is usually best heard using a low-level connection. The LFE channel and low frequencies from your surround speakers are all routed to the subwoofer.
However, if you want to listen to music on the same system, then using the high-level input might give a better balance to the sound. How do you configure this to work? Well, I shan’t lie. It can be complicated!
Using high-level connections, you must disable the bass management to listen to music on an AV receiver – so a full audio signal is sent to the front left and right stereo channels. Then, the low-level input won’t get any low-end audio sent to it.
You can either:
- Set the front speakers to ‘large.’
- Select a direct listening mode to do this, like Pure Direct.
Pure Direct disables all processing, including bass management. However, these options will vary between receivers.
However, if you disable all processing, any room EQ will also be disabled on the receiver. This may muddy the low end if the receiver’s EQ is doing plenty of work on the bass frequencies.
But all this depends on your room, your speakers and the location of the subwoofer. Of course, you don’t have to use the high-level input to listen to music. The alternative is to use the low-level input for everything – including music.
A standard stereo listening mode on your AV receiver will still use bass management to filter the low-end from your main speakers and pass it to the subwoofer.
It will also use any EQ that room correction has enabled. This will often give a cleaner bottom end to the sound.
I prefer this option, but you might not. It will depend on your room, amplifier, speakers, and just what sounds best to you.
There isn’t a right or wrong. Simply different. Don’t let anyone tell you that one sounds right and the other does not. Apart from if it’s me. I’m always right. 🙂
How to Connect a Wireless Subwoofer
There may be times when connecting your subwoofer with a cable is plain old frustrating. It’s easy enough if your subwoofer is located close to your amplifier.
However, one of the advantages of a sub is that the low frequencies can be difficult to localize. This means that you have the freedom to place the subwoofer pretty much anywhere in the room.
The downside is that you might need long cables to reach your favored position. Long cables can introduce noise in an audio signal – and they can be difficult to hide if you want to keep your room looking clean and tidy.
Fortunately, several solutions exist for making a wireless connection to your subwoofer. The SVS SoundPath Wireless Audio Adapter is one simple solution to this problem.
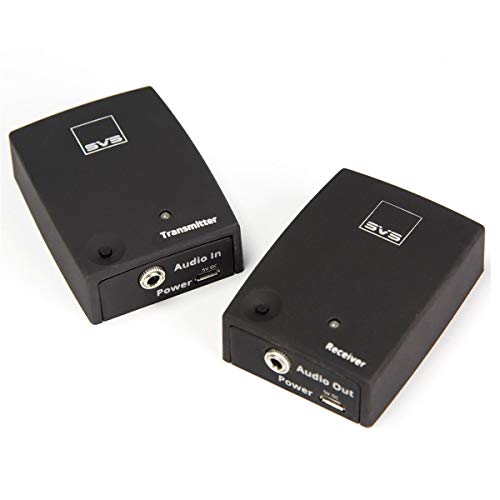
- Remove the wires from your home theater installation
- Works with subwoofers, powered speakers and more
- 65-foot range
- Frequency Response: 6Hz to 22kHz +/-1 dB
- Might not work through walls or in congested wireless networks. If so, try the SVS Tri-Band Wireless Audio Adapter.
It comes with transmitter and receiver modules. All you need is to connect your receiver’s subwoofer output to the transmitter’s audio input.
Then, connect the receiver’s audio output to the subwoofer’s line input. Once the modules are paired, it will send full range 5Hz – 24 kHz audio from the receiver to the sub.
The modules have USB power supplies that must be connected to a power source. The newer SVS subwoofers also have a USB connection on the rear for powering the modules.
The timing and bass management are performed by the AV receiver.
While designed for SVS subwoofers, these modules can also be used with any subwoofer with a low-level line input. Or any powered speaker or amplifier.
- Learn more: Surround sound packages vs. individual speakers
How to Connect Two Subwoofers to an AV Receiver
While a single subwoofer is fine for most rooms, there can be several advantages to installing two – or more – subwoofers.
The main benefit of multiple subwoofers is to even out the bass response around your room so that every listening position will receive a balanced sound of low, mid and high frequencies.
The problem with low bass frequencies is that the wavelength of the sound waves is pretty long. And this can cause all sorts of issues when trying to get a balanced sound in a small room.
Adding another subwoofer can help to spread the bass in the room and avoid any areas with peaks or troughs in specific frequencies.
How do you add a second subwoofer to your system? There are a few ways.
1. AV Receiver with Dual Subwoofer Outputs
Many modern AV receivers now come with two subwoofer outputs. Therefore, the easiest way of adding another subwoofer is if your AV receiver has this option.
You only need to connect the ‘Sub 1’ pre-out to one subwoofer – and the ‘Sub 2’ pre-out to the other.

You would connect each with a single RCA cable, as explained previously.
Most AV receivers will simply send the same audio signal from each output.
However, some higher-end receivers have an independent audio feed from each output. This can make it easier to EQ and balance the bass in the room, as subs in different positions might need different treatments.
2. Use a Y Splitter Cable
If your AV receiver only has a single subwoofer out – don’t despair.
A simple solution is to buy a Y-lead RCA cable. This type of cable has a single RCA connector at one end – but splits into two separate RCA connections at the other.

- Available sizes: 3, 6, 10, 15, 20 and 25 feet
- Good value
- Solid construction
- 75-ohm impedance - suitable for analog and digital audio signals
- The split is approximately 8 inches from the dual RCA end. Make sure this is enough to reach both inputs.
You just need to connect the single connector to the subwoofer pre-out of your AV receiver. And plug the two extensions into each subwoofer input. Then just set up your AV receiver as normal.
The main thing to consider is how far away – and how far apart – the subs are. The cable must reach both, so it’s easier if they are relatively close.
If this might be a problem, an alternative is to buy a shorter Y-adapter like this one:

- Suitable for digital audio or subwoofer connections.
- Short cable adapter for easy installation
- Pro-grade connectors and build quality
- You'll need to buy extra RCA cables for each connection.
Then you can just connect two longer, separate RCA cables to each sub.
This might make it easier to run cables wherever the subwoofers are in the room.
3. Daisy-chain the Subwoofer Output
You can only do this if supported by your subwoofers. However, some subs have two line-level connections – an input and an output.
In this case, you would typically connect the AV receiver to the first subwoofer.
Then you would connect an RCA cable from the first sub’s output to the second sub’s input. Like so:

This is called daisy-chaining. Where the signal passes through one device and onto another. This allows you to simplify the cabling in your room and add an extra subwoofer to a single AV receiver output.
You can also use this method to add even more subs around your room.
Always check the manual of your subwoofer to understand any limitations to this process.
For example, you should only daisy chain the same type of connection. This means you should only use the stereo line output on subwoofer 1 if the AV receiver is wired to the stereo line-level input.
Wrapping Up
So, there you have it. And you thought connecting a subwoofer to your speaker system was easy! Well, the good news is that it can be.
But there are several things to consider when hooking up a subwoofer. The main thing is to decide if you want to use high-level or low-level connections. And if your hardware will support both of these options.
While connecting the cables is relatively straightforward, it can get complicated when working out how to configure it all.
However, once you have it all worked out, adding a high-quality subwoofer to your speaker system can make all the difference in getting a fantastic sound in your room.
About The Author
Paul started the Home Cinema Guide to help less-experienced users get the most out of today's audio-visual technology. He has been a sound, lighting and audio-visual engineer for around 20 years. At home, he has spent more time than is probably healthy installing, configuring, testing, de-rigging, fixing, tweaking, re-installing again (and sometimes using) various pieces of hi-fi and home cinema equipment. You can find out more here.


