
Home theater wiring can seem confusing with all the cables and connectors. But with some research, you can certainly do it yourself.
First, ensure you can identify the different cables and connections you’ll need. Understanding what they do helps determine the best ones to use.
Yes, you may need to hire a professional installer for large, complex systems involving construction. But for many home theaters, planning the connections and spending time on the wiring will allow you to DIY.
The key is to take your time and make a plan before you start connecting your AV components.
Main Topics
Home Theater Wiring Gallery
The first thing to be clear about is the different connection types found in most home theater and audio-visual devices.
Here are images of the most common video and audio cables. Follow the links for more detailed information on each type.
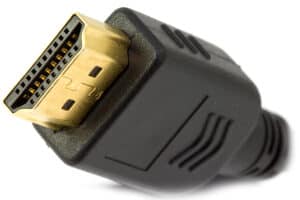
HDMI connections are the standard for connecting modern audio-visual devices

DVI connections are a good quality video interface for sending analog or digital signals

A component video cable is used to transfer high-quality analog images between devices

S-Video is a medium-quality analog video connection used in many consumer products

Composite video is a basic video connection found in most playback devices and video products

A SCART connection is an analog interface for sending video and audio signals

The VGA connector is an analog video connection widely used on computers and laptops

Optical audio is a common connection for sending digital audio signals

Coaxial connections are a popular method for sending digital audio signals between devices

The stereo RCA plug is a common connection for transmitting analog 2-channel audio

A multichannel RCA connection is a way of sending analog surround sound between devices

The mini stereo jack is a common connection used to send analog stereo audio signals

Speaker wire is used to connect an amplifier to stereo or surround sound speakers
Interconnect, Lead, Cable or Wire?
Even the terminology used when connecting a system can be puzzling. Usually, anything that joins two AV devices, like from the DVD player to the amplifier, is called an interconnect.
Then, the connection that sends the audio from the amplifier to the speaker is called a wire or cable.
However, in home theater wiring discussions, these terms are often used interchangeably, and people use cable, lead or wire for all types of connections.
What Do the Different Home Theater Connections Do?
It’s all very well identifying the different cables and connections you will encounter. However, you still must decide which one to use.
Even though this sounds like an easy process, it’s common to have a choice of different connections for sending sound and pictures between your devices.
And some will give better results than others.
So, which are the best ones to use, and why should you choose one connection type over another? First, it’s helpful to be clear about what each type does.
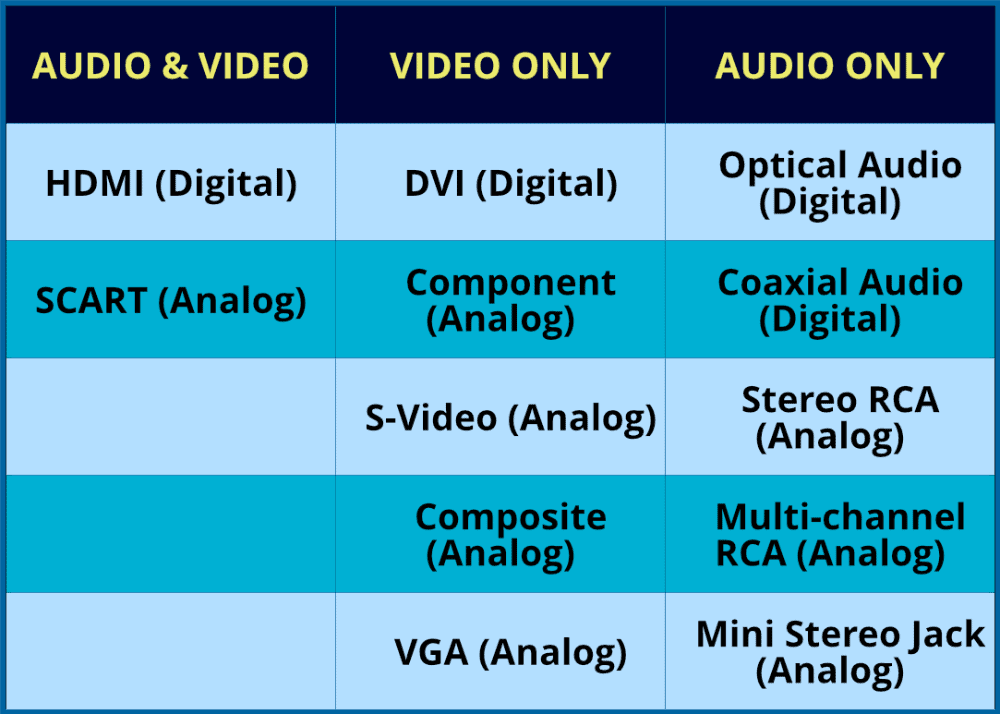
Audio and Video Connection Types
You will find a range of connections on the back of your TV, Blu-ray player, AV receiver, etc. Your first task is to identify what they are for.
You can break down the connection types into three broad areas:
- Audio + Video
- Video Only
- Audio Only
Therefore, you can use some connections to send pictures and sounds between your devices. In comparison, others are purely for the picture or sound. This is important.
Let’s say you are connecting your Blu-ray player to your TV.
If you use a connection that only sends the picture, you know that you will have to use another cable to send the sound. Or you won’t hear anything!
Here is a list of the main home theater cable connections and what you would use them for.
So, once you understand the connections on your devices, you can work out if you can use just one for the picture and sound – or different ones.
For instance, if your DVD player has an HDMI output, but your TV doesn’t have an HDMI input, you won’t be able to connect via HDMI.
So, you will have to see which connection types they have in common and use those instead.
Using Adapters with AV Connections
Having said that, if you are stuck, a wide range of adapters may enable you to connect from one connection type to another.
However, there are limitations to this approach, so this may not always be possible.
For example, you cannot connect directly from an analog connection to a digital one because the two signal types are incompatible.
There might be ways to do this by using a converter, but this can sometimes prove expensive. So, you would often use this as a last resort.
Which Home Theater Connection Should You Use?
You’ve learned you might have a few different home theater connections in common between your devices. So, which ones do you use?
There may not be an exact answer to this question, and you can use any number of these to connect your system.
But it’s a good idea to make a rough order of preference to give you a start.
For video connections, the order of preference relates to the quality of the video signal each type produces. The better the quality, the sharper and clearer the picture should be.
Also, because many products are now digital rather than analog, you would usually favor a digital connection over an analog connection.
Bear in mind that your choice may be limited by the connection types you have available on your equipment.
Therefore, for the picture, you should use the video connections in the following order of preference:
- HDMI
- DVI
- Component
- VGA
- SCART
- S-Video
- Composite
For the audio connections, the order is more based on the capabilities of the connection type.
For example, a connector that allowed the transfer of surround sound and stereo audio would be placed above one that only allowed stereo signals.
Again, you would typically favor a digital connection over an analog connection. However, the actual connections present on your devices may limit your options.
Therefore, for the sound, you would often use the audio connections in the following order of preference:
- HDMI
- Optical
- Coaxial
- Stereo/Multi RCA
- Mini Stereo Jack
Choosing the best connection type isn’t an exact science. For instance, optical and coaxial digital audio connections are similar in their benefits and limitations. But there may be specific reasons for choosing one type over another.
However, if you use this as a general guideline, you won’t be far off.
Notice that the HDMI connection appears at the top of each list. This reflects that HDMI is the first connection you should try to connect your audio-visual devices.
HDMI has the advantage of being digital; it supports all the latest types of video/audio, and you only need one cable to send both the sound and picture.
How to Wire Your Home Theater
It can be useful to get a picture in your head of how you are going to connect your system together.
If you are new to this, the following is a simple home theater wiring diagram that summarizes the general cable flow in your room.

The above scenario is a common wiring solution for a modern home theater, where an AV receiver is the center of everything. In very basic terms, you need to:
- Connect all the outputs of your playback devices to the rear of the AV receiver
- Connect an output cable from your AV receiver to your display device – usually a TV or projector.
- Connect your speakers to your AV receiver with speaker wire: how to connect speaker wire.
This layout may be different for you depending on what devices you have in your system. For example, if you don’t have an AV receiver, you can connect your playback devices directly to your TV.
If you then want to use an external sound system, you could send the audio from your TV to an amplifier or a soundbar system.
Everything is possible. It’s just using an AV receiver can make the process simpler – and, often, with fewer cables. There is more detail in the guide on how to install surround sound.
Home Theater Wiring Installation Tips and Ideas
There is a range of things to consider when you are wiring your home theater system.
Once you have decided on the best connection type and cables to use, you still have to tackle the potentially tricky task of actually plugging everything in.
You can find yourself in a right tangle – literally! – if you start frantically connecting your system together without giving it proper consideration. However, with some thought and a clear plan, it doesn’t have to be like that.
If you have a large project, then you may want to consider hiring professional cabling installers to do the tricky stuff for you, but on a smaller scale, there is no reason not to have a go yourself.
Once you understand all the connection types listed above, there are a few other points to bear in mind when you are faced with installing home theater wiring.
So, here is a list of things to think about. These tips are relevant to installing all types of cables – both video and audio interconnects – as well as speaker wire.
1. Think About the Connections Before You Buy Your Equipment
You can make your life much easier if you give some thought to this matter before you buy your equipment.
If you understand how you are going to connect your devices together, you can use this as a consideration when you are buying your hardware.
This can save you the problem of getting a piece of equipment home and then finding out that it doesn’t have the right connection types for your existing devices.
Or it means that you can at least add that special connection cable into your budget and buy everything at the same time.
Also, take some time to make sure the cables you need are male or female connection types. The connections on devices are usually female. Therefore, most cables will need to have a male connector. However, it’s always best to double-check before you buy the cable.
And what is the input connection type on the other device? Male or female? By checking this first, you can make sure that you buy the correct cable.
It can save you the trouble of replacing the new cable – or buying adapters to correct your original mistake.
2. Don’t Be Tempted to Pay Too Much for ‘High Quality’ Cables
The price of a cable doesn’t necessarily provide a good benchmark for the picture/sound quality you will get.
A well-made no-frills cable will perform just as well as most super-expensive cables and interconnects you may see in the shops – especially for shorter cable lengths – say up to 3-4 meters.
Long cable runs may benefit from spending a bit more – but even then, you don’t need to go overboard. Any benefit you get will be fairly small – and most people won’t have the high-quality hardware to benefit from any improvement anyway.
Most casual listeners/viewers just won’t notice any difference in quality between cheap and expensive cables. And that is if there is a difference to be seen or heard anyway.

The main improvement you get with more expensive cables is better shielding to avoid electrical interference to the signal, which can affect the picture or sound quality.
In most home environments, you don’t need this extra shielding, and so you will get very little benefit from expensive cables.
Having said that, a cheap and poorly made cable could degrade the picture or sound on your system – or, more likely, will just prove to be unreliable. So just be sensible and use your common sense. Buy something well-made – but you don’t need to break the bank.
This is true for both interconnects and speaker wires.
3. Try to Keep the Cable Lengths Down to A Minimum
Shorter cables can help you to get the best from your equipment. There are a few reasons why you should try to keep the length of your cables down. Long cables can:
- degrade the quality of the signal
- make electrical interference more likely
- create a tangle of cables behind your system that is difficult to manage – and looks unsightly
When you are buying cables, try to estimate the distance you need for each one and buy the appropriate lengths.
For example, if your DVD player is positioned near your AV receiver, then you won’t need a long HDMI or coaxial digital audio cable. One meter may be enough.
However, the HDMI cable that is needed to run from your AV receiver to the TV or projector is likely to be longer. So, you can get a 3 or 5-meter cable for this.
Having said that, don’t cut it too fine. Give yourself a bit of slack to enable you to pull the device forward from your unit/rack without pulling out all the cables. This will make routine maintenance and cleaning much easier.
If you do need to have a long cable run, then it becomes more important to buy better quality cables – but you still don’t need to pay the earth – see point 2.
In the case of speaker wire, then thicker wire (lower gauge in the US) will be better for long runs as this reduces the resistance, and in theory, you will lose less signal.
Take a look at the in-depth guide if you want to know how to choose the best gauge speaker wire.
4. Consider Adapters and Converters
In most cases, you will have the same connectors on each device to connect between. For example, you will connect from HDMI to HDMI. Or from optical audio to optical audio.
This is nice and easy, as you just use a standard interconnect for the connection. However, depending on the equipment you have, you sometimes need to connect devices that have different connections.
For instance, one device may have an optical digital audio output, but the other device has a coaxial digital audio input.

Don’t despair. In this situation, there is a wide range of converters and adapters that you can buy to enable you to connect between different connection types.
In the case of an optical-to-coaxial connection, you can buy an optical-to-coaxial converter:

- Use it if you don't have the correct digital audio connections on your device
- Bi-directional so you can convert both ways
- Supports uncompressed stereo PCM audio and 5.1 Dolby Digital and DTS
- Works up to 30 meters
- Power connection required
Or you may just be able to buy a specially made cable with different connections on each end. It depends on exactly what you need to convert.
For example, if your digital video projector has a DVI output and your TV only has an HDMI input, you can get a DVI-HDMI cable to connect these devices together:

- For any HDMI and DVI connections, including laptops, PC's, game consoles and set-top boxes
- Sizes: 3 and 6 feet
- Supports 1080p video, from 800x600 to 1920x1200 resolution
- Bi-directional - HDMI out to DVI in, or DVI out to HDMI in
- Video only; you will need to make a separate connection for audio
The biggest problem often occurs if you need to connect an analog connection to a digital one – e.g., component video to HDMI.
This is more difficult as converting a signal from analog to digital usually requires some sort of electrical device that can prove expensive. Here is an example of a component video to HDMI converter at Amazon:

- Supports HDMI 1.3
- Component input formats: 4080i/p, 576i/p, 720p, 1080i/p
- Supports uncompressed stereo LPCM audio
- 5-year warranty
- Not bi-directional - for component to HDMI only
This device will accept an RGB component video signal – plus stereo left and right audio. It will then output all this via HDMI.
Another thing is to make sure that the converter cable or box will work in the right direction.
For instance, a DVI to HDMI cable may only work if you are sending from a DVI output to an HDMI input. If you need to send from an HDMI output to a DVI input, then you may need a different cable.
Be clear about what you are sending from – and to – and check the description of the converter cable or box to make sure it will do what you want.
There are also solutions if you don’t have enough inputs or outputs on your devices. For example, if your TV only has three HDMI inputs – and you have five video sources that you want to connect.
In this case, you can buy an HDMI switch. This will allow you to connect more devices to your TV.
Another common issue is you want to send the output of your Blu-ray player to a TV and projector at the same time – or to more than one TV. The solution here is to buy an HDMI splitter, which will send the same output signal to multiple destinations.
Another option is to use an HDMI audio extractor that will allow you to split the audio from the HDMI signal and send it to another place – like an amplifier.
These devices will also let you change the audio type. So you could convert the digital HDMI audio signal to stereo analog, for example.
5. Try and Keep Video and Audio Cables Away from Power Cables
Power cables produce an electrical and magnetic field which can affect the signal quality in audio and video cables.
In audio cables, this may result in an audible ‘hum’ over the speakers. With video cables, you may get lines across the image.
It is often difficult to keep these cables apart completely when you are doing your home theater wiring installation. But just try to make sure they don’t run alongside each other for long distances.
If they need to cross each other, run them at 90 degrees, so they have little contact. If this is a problem in your system, then you may need to buy better-quality audio/video cables with greater insulation.
Sometimes buying the right stand or cabinet can also help. Many of these have cable management sections that allow you to easily separate the different cables.
6. Plan Your Connections
When you are connecting your system together, you can make it easier when you think clearly about what you are trying to achieve and plan what you are going to do.
If you get confused by all these connections and cables, try to think about the direction of the signals in your system. There are some connections that are ‘outputs’ and some which are ‘inputs.’
Hopefully, this will be clearly written on the device. If not, it is often because it is obvious what the connection does i.e. an HDMI port on a TV is obviously an ‘input’ as it receives the picture for the TV to display.
Therefore, you will always connect the ‘output’ of the source device to the ‘input’ of the receiving device.
If you are connecting a Blu-ray player to a TV and a surround sound amplifier, then:


Note: if the surround sound amplifier has HDMI inputs, you will probably connect everything via HDMI. However, this is an example of how you might connect it.
If you break down your whole home theater system into individual connections, you can easily connect a quite complicated setup just by thinking about each connection one at a time.
It might help to get out a pen and paper (remember those?) and write it down. Or, draw some squiggles in your favorite note-taking app.
And, if you have a record of how your system is connected, it can help in the future if you need to replace something – or troubleshoot a problem. You’ll probably have forgotten how you wired it all together in a week or two!
About The Author
Paul started the Home Cinema Guide to help less-experienced users get the most out of today's audio-visual technology. He has been a sound, lighting and audio-visual engineer for around 20 years. At home, he has spent more time than is probably healthy installing, configuring, testing, de-rigging, fixing, tweaking, re-installing again (and sometimes using) various pieces of hi-fi and home cinema equipment. You can find out more here.


