
Experience total immersion with a surround sound system set up to perfection. This step-by-step guide makes it easy, walking you through speaker placement, connections, sound balancing, and troubleshooting common issues.
With tailored tips for beginners, you’ll have the knowledge to create a thrilling, cinematic audio environment right in your living room. Let’s dive in and take your home audio to the next level.
Main Topics
Before You Start: What Equipment Do You Need?
Before embarking on your surround sound setup journey, you must have all the necessary equipment. Here’s a basic list:
- Speakers: A typical surround sound system has five speakers (front left, front right, center, rear left, rear right) and a subwoofer, also known as a 5.1 system. However, your system may have more speakers, such as in a 7.1 or 9.1 or a Dolby Atmos layout like a 5.1.2 or 7.1.6 system.
- AV Receiver: This is the heart of your system. The receiver is responsible for receiving and processing the audio signal from your source (TV, DVD player, etc.) and sending it to your speakers.
- Speaker Cables/Wires: You’ll need enough cable to connect each speaker to the receiver. The exact length will depend on the layout of your room and speaker placement. Some setups may also have the option of using wireless speakers, meaning you won’t need wires for some (or all) speakers.
- Audio Source(s): This could be a DVD player, Blu-ray player, game console, streaming device, or even your TV. It’s where the audio signal comes from.
In this guide, I will discuss installing a surround sound system using an AV receiver – my preferred way, which will give you the most flexible setup.
However, there are other ways of getting surround sound without using a receiver. Unfortunately, many people get stuck deciding which type of system to use and give up on the idea!
But it’s not so hard, so don’t despair.
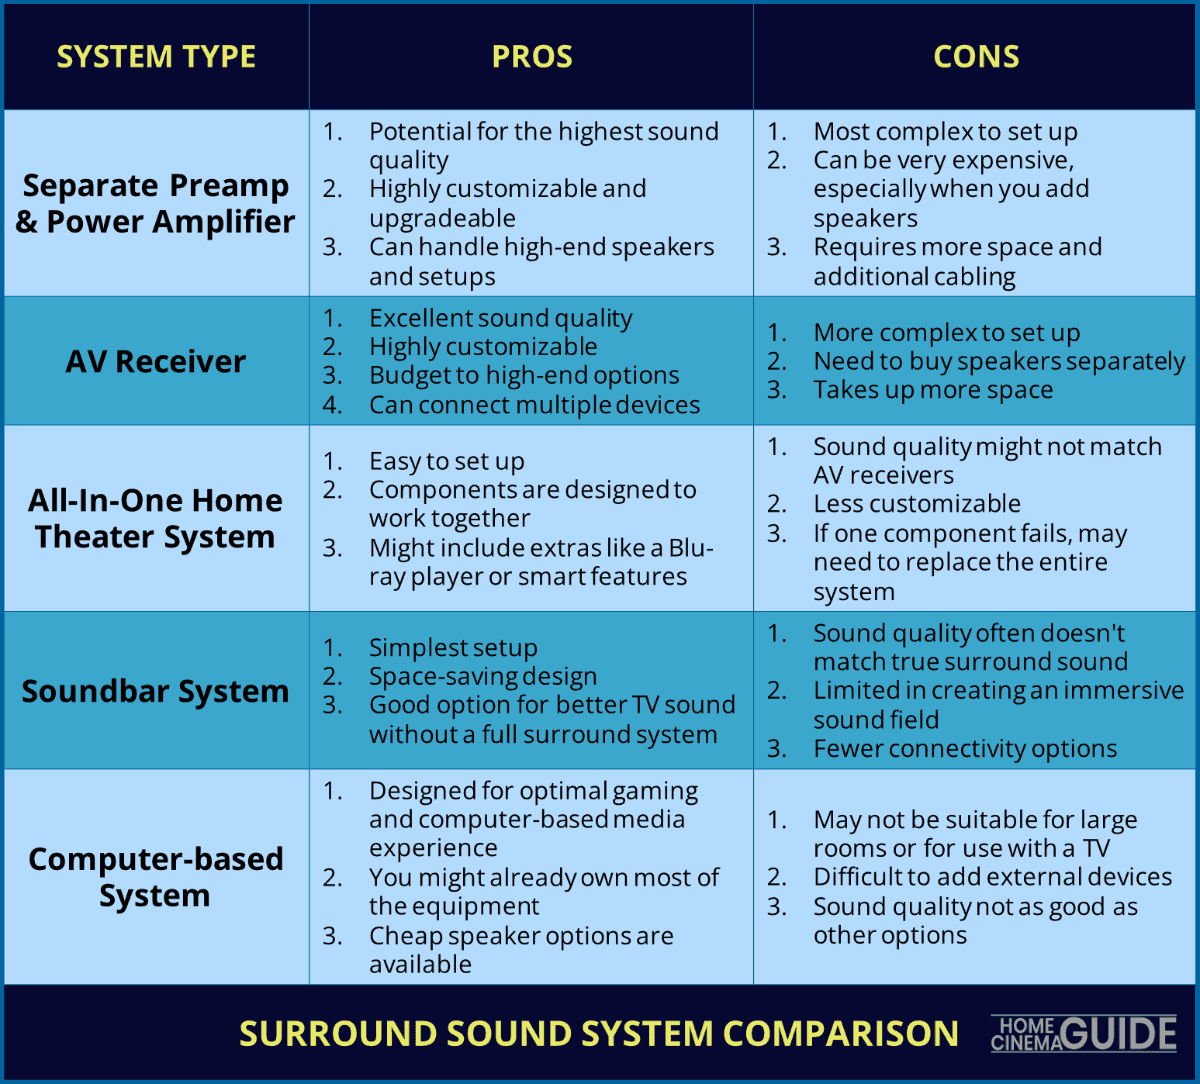
There are five main types of surround sound systems you can use:
- Separate Preamp and Power Amplifier: This option is for enthusiasts striving for the best sound quality. It’s like an AV receiver but split into two individual components.
- AV Receiver: The most flexible option and the one I recommend. However, it is not the easiest method to set up, so avoid this if you don’t like tinkering with technology. You will need to buy an AV receiver and a separate speaker package.
- All-in-one Home Theater System: The best option if you want to buy a complete system with everything you need for surround sound.
- Soundbar System: Similar to an all-in-one system, but the main component is a discreet soundbar speaker to place under or over your TV.
- Computer-based System: Use this if you already have a good computer or are into gaming.
Here are the pros and cons of each system type:
Whichever option is best for your situation, the fundamentals of setting up surround sound are the same, so this guide should help clarify the finer points for you.
Step 1: Speaker Placement
Carefully unpack all the speakers and think about where you will put them. The placement of your speakers is crucial to getting the best surround sound experience.
Here is a general guide on where to place each speaker in a 5.1 system:
- Front Left and Front Right Speakers: These should be placed at an equal distance from the central listening point (usually where you’ll be sitting to watch TV or listen to music) and should form approximately a 30-degree angle to the left and right of this point.
- Center Speaker: Place the center speaker in front of the central listening point. If you’re using a TV, you will position the center speaker above or below, in the middle of the screen.
- Surround Left and Right Speakers: Place the surround speakers behind the central listening position, ideally at an equal distance from it and at approximately a 110-120-degree angle to the left and right of this point.
- Subwoofer: The subwoofer can be more flexible in its placement because the low-frequency sound is less directional, but a common spot is in the front of the room, off to the side of the TV. I like to place it somewhere between the front left and right speakers, but don’t sweat it if you don’t have the space.
Use speaker stands or wall mounts for optimal performance. Speakers work best when secure and on a surface that doesn’t resonate with the sound vibrations.
- Learn more: Home theater speaker placement tips
Step 2: Connecting Your Speakers to the Receiver
After placing the speakers, you must wire them to the amplifier.
Take your time and ensure you wire them correctly with the same cable connecting the positive and negative terminals on the amp and speaker.
If not, the sound will be out of phase and won’t sound great.
Of course, if you have wireless speakers, you won’t need to use wire.
Here’s how to do both:
For Wired Speakers:
- Identify the Terminals: On the back of your receiver, you’ll see color-coded terminals or ports for each speaker. The typical labels are FL (Front Left), FR (Front Right), C (Center), SL (Surround Left), and SR (Surround Right) to correspond with each speaker. The subwoofer is usually a separate RCA output labeled Subwoofer or LFE.
- Prepare the Speaker Cable: Strip a small section off the end of your speaker wire to expose the metal conductor. Be sure to keep the positive (often red or marked with a ‘+’ sign) and negative (usually black or marked with a ‘-‘ sign) wires separate.
- Connect the Speaker Cable to the Speaker: Connect the other end of the speaker wire to the corresponding terminals on the receiver. Again, the positive wire to the positive terminal and the negative wire to the negative terminal. Ensure to wire the correct speakers to the corresponding terminals.
- Connect the Speaker Cable to the Receiver: Connect the other end of the speaker wire to the corresponding terminals on the receiver. Again, the positive wire to the positive terminal and the negative wire to the negative terminal. Always ensure you wire the correct speakers to the corresponding terminals.
- Connect the Subwoofer to the Receiver: The subwoofer usually requires a single coaxial RCA cable from the receiver’s RCA output to the sub’s input.
- Tidy the Cabling: Only use as much wire as you need to run comfortably between the amp and speaker, making it easier to keep the room looking tidy. Hide the wires behind cabinets, rugs and furniture where you can, or consider using cable clips or painted conduits. You can also route the cable behind the wall, but this requires top-notch DIY skills – or a paid professional!
- Learn more: How to connect speaker wires
For Wireless Speakers:
- Power up Your Speakers and Receiver: Make sure your wireless speakers and the receiver are connected to the power source and turned on.
- Pair the Speakers to the Receiver: This process can vary depending on your specific equipment, but generally, you will go into the settings menu on your receiver, look for a section related to wireless speakers, and follow the prompts to pair each speaker. Refer to your receiver and speaker manuals for exact instructions.
- Confirm the Connection: Once you have paired your speakers with the receiver, do a quick sound test to ensure they’re correctly connected and the sound from each speaker is balanced. You can do this through a built-in speaker test function in the receiver settings.
Even with wireless speakers, remember each speaker will need a power cable, so even these setups aren’t entirely free from those pesky wires.
Step 3: Connecting Your Audio/Video Sources
Your audio and video sources, such as your TV, DVD player, game console, or streaming device, must be connected to your receiver to send audio signals to your surround sound system.
Here are the general steps to wire your audio/video sources:
- Identify Your Connection Types: Look at the back of your receiver and your source devices to see what kind of connections they support. Common types include HDMI, Optical (also called Toslink), Coaxial, and RCA (red and white RCA inputs).
- Choose the Best Connection: HDMI is the best choice for most modern devices because it can transmit high-quality audio and video. If HDMI isn’t available, optical and coaxial are good choices for audio-only connections, while you can use stereo RCA for older analog devices. Older video equipment may use component or composite video connections that don’t pass audio, so you will need to make a separate connection for the sound. If you know you’ll need to use an older video type, make sure your AV receiver has these inputs. Newer models are removing these, and many only have HDMI.
- Connect Your Source Devices to the Receiver: Connect one end of your chosen cable to the output port on your source device and the other end to the corresponding input port on your receiver. For example, if you’re connecting a DVD player via HDMI, you would wire the HDMI cable to the HDMI out port on the DVD player and to an HDMI in port on the receiver.
- Assign Inputs (if necessary): Some receivers require you to assign or label the inputs you’ve just connected. For example, if you connected your DVD player to the HDMI 1 port on your receiver, you might assign that port the label ‘DVD Player.’ Correct labeling helps you easily select the right source when using your system. Most receivers already have everyday device name labels, so if you use the right inputs, they will have the correct terms already. If you don’t, it doesn’t matter. It simply makes using the system more straightforward.
- Repeat for All Source Devices: Repeat the process for each source device you want to connect to your receiver, including your TV, game console, DVD player, Blu-ray player, or streaming device.
They say a picture is worth a thousand words. So, maybe this simple wiring diagram will help if you are completely lost.
Here is the basic wiring for a 5.1 home cinema system with an AV receiver:

One problem with AV receivers is there are so many connections. But it’s not so hard once you take it section by section.
Here are the main parts on the back of a receiver:

The main thing to remember is you don’t need to use all of the input connections. The main reason there are so many is to give you plenty of choice for connecting your external devices.
- Learn more: Home theater wiring advice and ideas
Step 4: Configuring the Receiver
Once you’ve connected your speakers and source devices, it’s time to configure your receiver. This process optimizes your surround sound system for the best possible audio experience.
Here’s how you can manually set up the receiver:
- Access the Receiver’s Setup Menu: Use the remote that came with your receiver to enter the setup options. Look for a button that says ‘Setup’ or ‘Menu.’ Press it to access the setup menu on the receiver. Switching on a new receiver for the first time will automatically start the setup process in most cases.
- Speaker Configuration: Look for a section related to speakers or audio in the setup menu, where you tell the receiver about the speakers you have connected. You’ll specify the number of speakers, their location, and sometimes their size (large/small). You should select ‘small’ in most situations, regardless of your speakers’ size. Otherwise, the receiver won’t use the subwoofer for very low frequencies. Follow the prompts or refer to your receiver’s manual for clarification.
- Speaker Distance: Some receivers allow you to input the distance of each speaker from your primary listening position. Entering the exact length will help improve the timing of sound delivery for a more cohesive surround sound experience. Measure from each speaker to where you mainly sit, and enter the results on the setup page, making sure you are using the correct units.
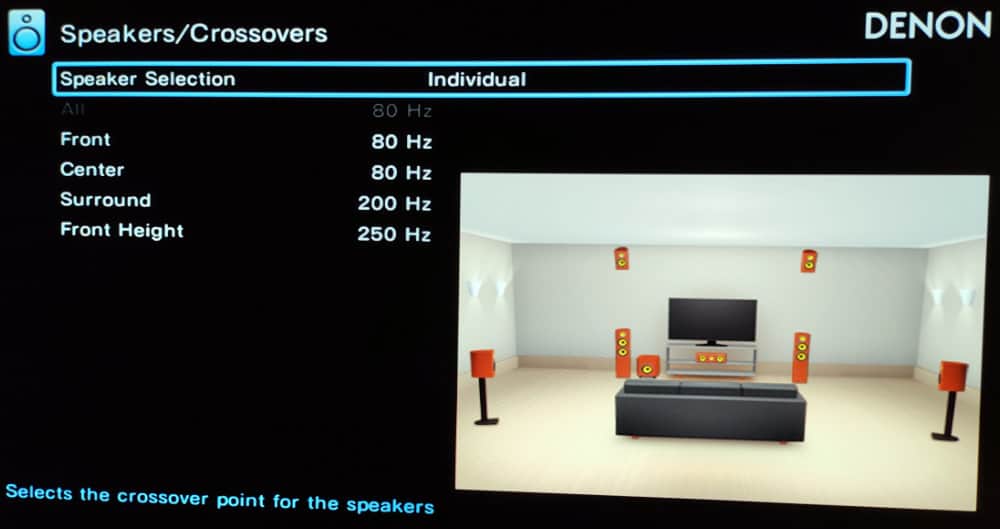
- Speaker Crossovers: The AV receiver’s crossover setting redirects low-frequency sounds to the subwoofer, reducing strain on the amp and optimizing sound quality. Set the crossover based on the speaker’s ability to reproduce low-frequency sound, starting around 80 Hz and increasing to 100, 120 or even 200 Hz for smaller speakers. Check each speaker’s specifications if you need more clarification. However, don’t set the crossover too close to the lowest frequency your speaker can deliver. You should put it a good deal higher to allow a smooth transition between the speaker and the subwoofer. Otherwise, you will leave a frequency hole where you will miss crucial sound information. If in doubt, move it higher rather than lower.
- Speaker Levels: Here, you’ll adjust the volume level of each speaker to ensure a balanced sound. The receiver generates a test tone to play through each speaker individually. You change the volume of each speaker so they all sound equally loud from your primary listening position. If you do this manually, you can use an SPL meter or an app on your phone to measure the decibel level at your listening position. Adjusting the level of each speaker will compensate for slight distance differences in volume where you can’t position the speakers equally.
- Audio Formats and Modes: Lastly, check the receiver’s settings related to audio formats and surround sound modes. Modern receivers often support various formats and modes (like Dolby Atmos, DTS:X, Stereo, etc.), which you can select based on the content you’re watching or listening to. Set most formats to ‘Auto,’ meaning it will automatically use the matching sound mode for the audio type. The exception is if you want to use an upscaling processing mode like Dolby Surround to play standard 5.1 audio over your larger 5.1.2 speaker layout.
If that all sounds complicated, you’ll be pleased to learn there is an easier way. Check out the automatic room calibration offered by your receiver.
Automatic Room Calibration
Many modern receivers come with built-in automatic room calibration software, making the setup process even easier and (possibly) more accurate.
This software uses a special microphone (usually included with the receiver) to measure a series of test tones at your primary listening position. It uses this data to automatically set the speaker levels, distance, and optimal equalization for your room’s unique acoustics.
The equalization provided by the room calibration system is the main reason for using the automatic setup process supplied by your device. All the other data points, like distances, levels and speaker sizes, are easy to do.
But fixing problem areas in your room’s acoustic response will impact sound quality more than almost any other part of your setup – including which amp and speakers you use.
And while you can install external devices to equalize the sound yourself, this is only recommended for enthusiasts who want complete control. If in doubt, stick to your amp’s automatic configuration platform.
To use this feature:
- Position the Microphone: Place the calibration microphone at your primary listening position at ear level. Some receivers come with a tripod for this purpose, or you can use a camera tripod if you have one.
- Run the Calibration Software: In your receiver’s setup menu, look for an option related to automatic calibration (it might be under names like Audyssey, YPAO, MCACC, or AccuEQ, depending on your receiver’s brand). Select this option and follow the on-screen prompts to start the calibration process.
- Stay Quiet and Let It Run: The calibration process typically involves the receiver playing a series of test tones through each speaker. It’s essential to keep the room as quiet as possible during this process so the microphone can accurately measure the sounds. Some systems require just one reading at the main listening position, while others provide more accurate results by measuring the room from several locations. The software will tell you what to do.
- Review the Results: Once the calibration process is complete, the receiver will automatically adjust your settings based on the measurements it took. It’s a good idea to review these settings to ensure they make sense (for example, the speaker distances should roughly match your actual speaker distances).
Unless you use room treatment techniques to fix problem frequencies in your room’s response, the equalization provided by the automatic room calibration can make or break the sound you get in your room.
But, while automatic room calibration can be very helpful, it might not always be perfect, especially in rooms with challenging acoustics.
Therefore, most people should use the automatic room calibration software in their AVR first, let it do its best to fix problem frequencies, and then manually fine-tune the speaker sizes, crossovers, distance and levels in the setup menu.
If you are more knowledgeable about home cinema and hi-fi or want to learn more about room acoustics, you can use software like REW (Room EQ Wizard) to measure your room’s frequency response.
You can then use an external EQ unit to modify the audio before it reaches your subwoofer. The low-end frequencies are usually the main areas you must fix to get a clean and balanced sound.
Step 5: Testing Your System
Now that you’ve set up and calibrated your surround sound system, it’s time to put it to the test. Testing will allow you to see how well the system performs and make any necessary adjustments.
Follow these steps:
- Select a Test Source: Choose a high-quality audio or video source that uses surround sound, like a Blu-ray movie, a video game, or a streaming service that supports surround sound formats. The test source should ideally cover a wide range of sounds, including dialogue, music, and sound effects.
- Listen and Watch: As you play your test source, sit in your primary listening position and pay close attention to the audio. The dialogue should come primarily from the center speaker, the main action sounds from the front speakers and ambient or background sounds from the rear speakers. The subwoofer should produce deep bass sounds without overpowering the rest of the audio.
- Check for Balance and Immersion: The sound from all your speakers should blend seamlessly to create an immersive sound field. No single speaker should stand out as being too loud or quiet compared to the others. Also, the sound should feel like it’s surrounding you and coming from the appropriate direction.
- Make Adjustments If Necessary: Return to your receiver’s settings and adjust if something doesn’t sound quite right. You might need to change the speaker levels, balance, or other settings. If your receiver has a manual EQ (equalizer) setting, you could also tweak this to fine-tune the sound to your liking. However, the automatic room calibration will usually do a decent job of fixing the major problem areas.
- Test with Multiple Sources: Different source devices and types of content can sound different on your system, so it’s a good idea to repeat the testing process with several sources. You might need to make slight adjustments for each one.
Setting up a surround sound system can be complex, but the results are well worth the effort.
By following these steps, you’ll be well on your way to a fantastic audio experience that truly immerses you in your favorite movies, TV shows, music, and games.
Step 6: Troubleshooting Common Issues
Even if you are careful with the setup process, you still might face issues with your surround sound system.
Here are solutions to some common problems:
1. No Sound from One or More Speakers
- Check Connections: Ensure you have securely connected all the wires to the speakers and the receiver.
- Check Receiver Settings: Ensure you have enabled all the speakers in the receiver settings. You may have inadvertently set a speaker to ‘off.’
- Test the Speaker: Connect the speaker to a different output on the receiver to see if it works. If it doesn’t, the speaker might be damaged.
2. Sound is Distorted or Not Clear
- Check Volume Levels: If the volume is too high, it can cause distortion. Try lowering the volume to see if the sound quality improves.
- Check Speaker Placement: Speakers placed too close to walls or corners can cause sound reflection, leading to distortion. Try adjusting the speaker placement.
- Check Cables and Sources: Poor-quality cables or a low-quality audio source can cause sound distortion. Try a different cable or source to see if the sound quality improves.
3. Sound Doesn’t Seem to ‘Surround’ You
- Check Speaker Placement: If speakers are not positioned correctly according to your listening position, the surround sound effect may not be optimal. Refer back to the speaker placement guide in Step 1.
- Check Sound Format: Ensure the content you’re playing supports surround sound and you have set your receiver to the correct sound mode.
- Calibrate Again: If you used the automatic calibration, try manual calibration for better results.
4. Subwoofer is Overpowering or Too Weak
- Adjust Subwoofer Level: Most receivers allow you to adjust the subwoofer volume separately. Try turning it up or down to achieve a more balanced sound.
- Check Subwoofer Placement: Experiment with different subwoofer locations. Moving the subwoofer just a few inches can make a big difference in sound quality.
- Learn more: Tips to fix your surround sound problems
Frequently Asked Questions
If you want some quick and easy answers, here are some common questions about setting up surround sound.
What Do You Need for a Surround Sound System?
The main thing you need for surround sound is an audio system that supports multichannel audio. Most sound systems are stereo, with two speakers. However, your speaker system will need at least five speakers for surround sound.
The main ways of getting multichannel sound are buying an AV receiver, an all-in-one home theater system, or a soundbar system that supports surround sound.
You then need to connect the audio output of your TV, DVD player or cable box to the sound system.
How Do You Hook Up Surround Sound to Your TV?
If you want to connect your TV to a surround sound system, your TV needs to have an audio output. The audio output will usually be an optical or HDMI ARC connection on modern TVs.
Once you have identified your TV’s audio output, you need to connect this to an audio system that supports surround sound. Your audio system might be an AV receiver, an all-in-one home theater system or a soundbar system.
For a step-by-step guide, go to how to connect speakers to your TV in 5 easy steps.
How to Hook Up Surround Sound Speakers Without a Receiver?
If you want surround sound but don’t want to buy an AV receiver, you should buy a soundbar system that supports surround sound – or a home theater system with an amplifier and all the surround speakers.
Can You Get Surround Sound Through HDMI?
Yes, HDMI supports the multichannel audio formats used in surround sound – such as Dolby Digital, DTS, Dolby Digital Plus and Dolby Atmos. The easiest way to get the surround sound audio from your TV using HDMI is to use a TV and sound system that supports HDMI ARC.
How to Connect Surround Sound to a TV Without HDMI?
If your TV doesn’t have HDMI, you will need to look for a different type of audio output. Many TVs have optical or coaxial digital audio outputs, while older televisions may only have a stereo analog output.
Whichever type your TV has, you can connect this audio output to a surround sound speaker system.
Alternatively, if you have a cable TV box or DVD player, you can connect the audio outputs to your surround sound system instead.
About The Author
Paul started the Home Cinema Guide to help less-experienced users get the most out of today's audio-visual technology. He has been a sound, lighting and audio-visual engineer for around 20 years. At home, he has spent more time than is probably healthy installing, configuring, testing, de-rigging, fixing, tweaking, re-installing again (and sometimes using) various pieces of hi-fi and home cinema equipment. You can find out more here.


